AWS Glue Tutorial
Intro
This is in continuation to the AWS Glue blog series. If you haven’t read our first article in this series, or you aren’t familiar with Apache Spark and/or AWS Glue, I recommend reading that before continuing further. In the first article, we learned about how Apache Spark / PySpark works, how AWS Glue helps in carrying out ETL and ML workloads, along with the alternate engines it provides.
In this tutorial, we are going to write and run a PySpark script that computes the top 10 most frequent 5-letter words from a text file and saves it as a JSON file. First, we will build an intuition of the data processing job that we are going to run on our local machine by creating a simple Python script and use that as our reference to compare the outputs and the execution time. Then, we will be using AWS Glue and Terraform to scale it to big data. During the process, we will learn why parallelism is important, how to test PySpark code locally using Docker, and how to set up and deploy our PySpark job to AWS Glue using Terraform.
Step 0: Getting the code
The code for this tutorial is hosted at https://github.com/infocusp/aws-glue-tutorial. Clone the git repository using the command:
git clone https://github.com/infocusp/aws-glue-tutorial.gitThe file structure is as follows:
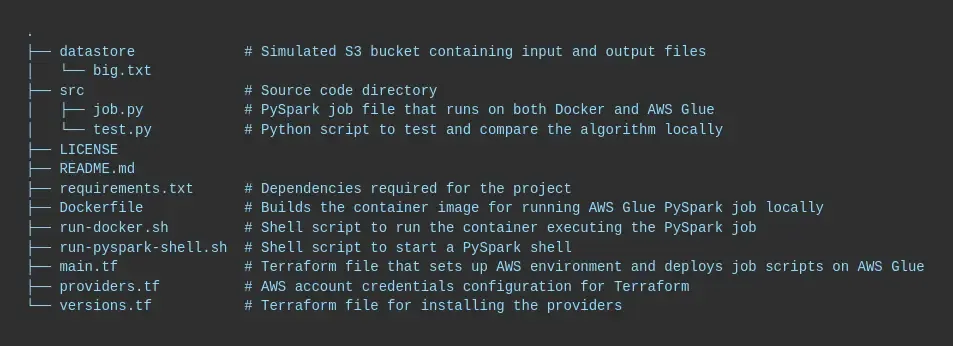
For the purposes of this tutorial, we have sourced a large text file for testing from Peter Norvig’s website which can be found at datastore/big.txt in the git repository.
Before we proceed with the examples, you must make sure that you have the necessary tools installed on your system:
- Python version 3.10
- Terraform version 1.5+
- Docker version 20+
After that, run the following commands to get started:
- Initialize the Python virtual environment
python3 -m venv .venv- Activate the virtual environment
source ./.venv/bin/activate- Install the Python dependencies
pip3 install -r requirements.txt- Initialize Terraform
terraform initFurther setup instructions are written down in the README.md file.
Example using simple Python
The code to perform the task is trivial. For this simple exercise, we aren’t removing punctuations from the words or handling the same words with different cases, which may result in false positives.
-
First, we have defined a set of global variables that we can use in the future to extend our program.
-
Second, we read the input text file into the text variable.
-
Third, we split the string at whitespaces into a list of words.
-
Fourth, we use a
Counterdata structure to count the frequency of the words we add. Here, we also filter the words having a length of 5. -
Fifth, we use the
most_commonmethod on the counts object to get the top 10 most frequent words. -
Finally, we write the result to a JSON file.
The Python script to run locally can be found at src/test.py:
# src/test.py
"""
This file is used to test and compare our algorithm locally.

The functionality is identical to the `job.py` file.
"""

from collections import Counter
import json

INPUT_FILE_PATH = "./datastore/big.txt"
OUTPUT_FILE_PATH = "./datastore/python:top-10_5-letter_words.json"
RANK = 10
WORD_LENGTH = 5

# Step 1: Read the contents of the file
with open(INPUT_FILE_PATH, "r") as file:
    text = file.read()

# Step 2: Split the text into words
words = text.split()

# Step 3: Count the frequency of each word having a length of L
counts = Counter[str]()
for word in words:
    if len(word) == WORD_LENGTH:
        counts[word] += 1

# Step 4: Select the top K words
top_10_words = dict(counts.most_common(RANK))

# Step 5: Save the results as a JSON file
with open(OUTPUT_FILE_PATH, "w") as file:
    json.dump(top_10_words, file)
To run this script, execute this command: python3 test.py. Upon completion, it should create a file under datastore/python:top-10_5-letter_words.json.
While the code looks simple, it doesn’t scale. Imagine processing multiple large text files. This is true in the case of LLMs. To train an LLM, the larger a text corpus is, the merrier it is. As a matter of fact, ChatGPT is trained upon 570 GB of data, and took 1000 NVIDIA V100 GPUs running in a supercomputer. In order to achieve the scale, it is necessary to parallelize the work into multiple nodes in a cluster, which Apache Spark is built to deliver. Let us understand in the following section how AWS Glue and PySpark make scalable data processing a breeze.
Example using PySpark
Let’s try to use PySpark to scale this task.
Firstly, we grab the arguments that passed to the job. The arguments are set to some default values when the job is first created. Then, on the job run, we can override the arguments either from the AWS console or the API. At runtime, the value of the argument will be either the default value or the overridden value. We must also remember that the value is always of the String type, and must be carefully cast to the desired type.
Then, we have some boilerplate necessary to run the job. This is left as an exercise for you to figure out what these lines of code do.
Next, we read the text file from the path specified in the argument input_file_name. The sc.textFile method attempts to read the file from HDFS, the local file system, or any Hadoop-supported file system and returns it as an RDD of strings, which in simpler terms means that we receive a list containing each line in the text file. Note that the individual lines may be partitioned into different nodes.
Once we have the text file read, we apply a series of transformations on the RDD. Let’s have a dive into this:
-
The
flatMapmethod turns a list of words per line into a list of words. -
Then, we
filterthe words having a length specified in the argumentword_length. -
Then, we
mapeach word to a tuple of the word itself and 1 (one). This is done in order to count the frequency of the words in the next step. -
We use
reduceByKeywith theaddfunction to increment the counts in the 2nd element of the tuple for each word as it scans through the list. -
We use the top method to get the top words from the list having the highest count in the 2nd element in the tuple. This method returns a
Listinstead of anRDD. -
Lastly, we write the results to a JSON file to S3 with the filename specified by the argument
output_file_name.
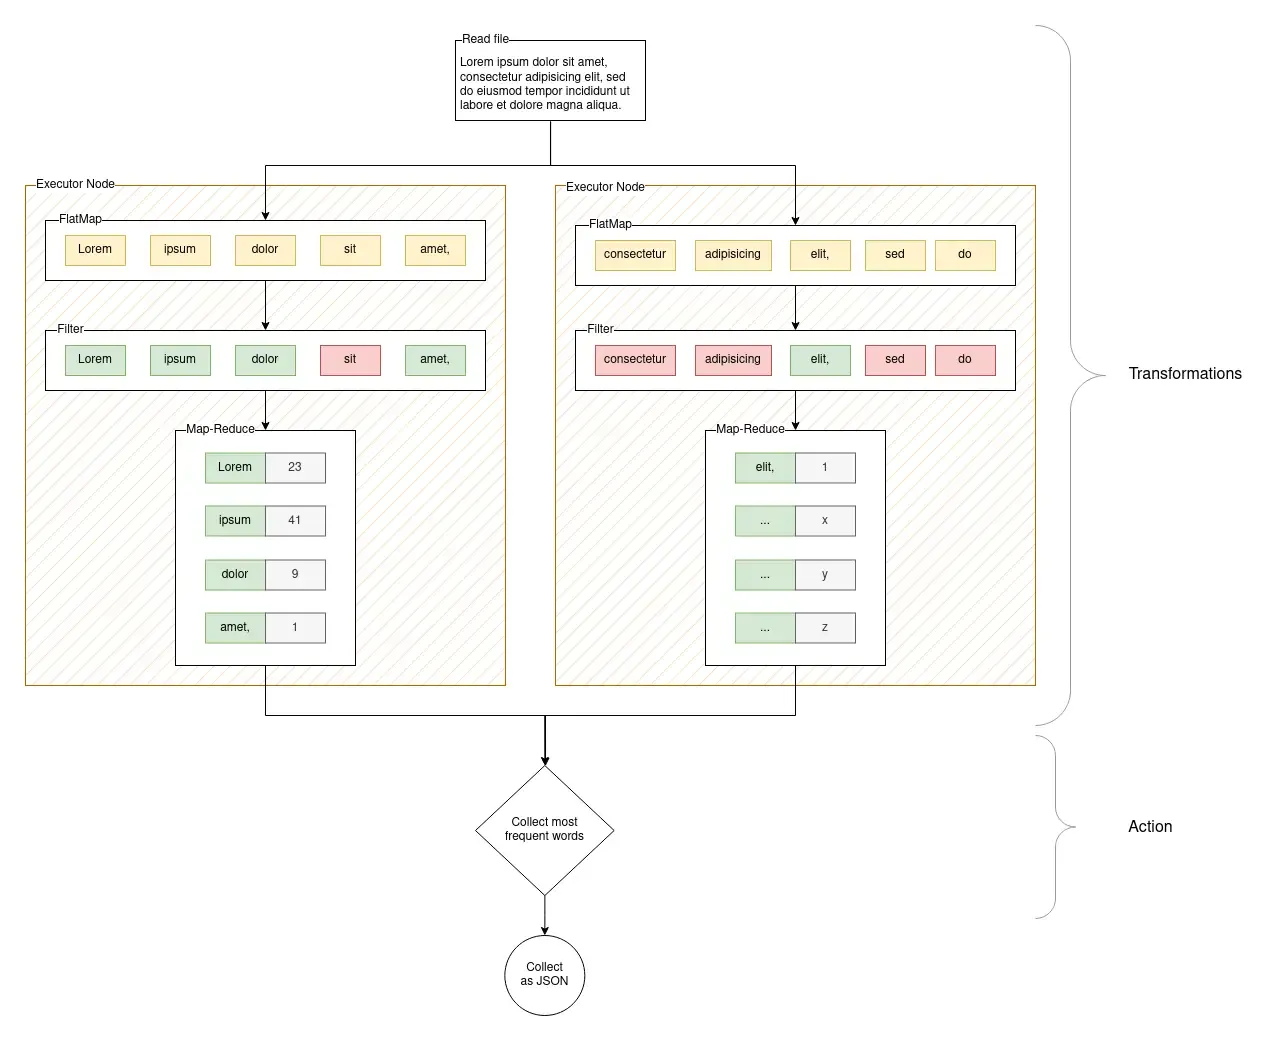
This scenario can be illustrated in the following diagram. This diagram shows the flow of the data while also depicting how the tasks are divided among the executor nodes, and visually depicts how an action is a terminal operation that marks the point where the DAG formed by the transformations are finally executed.
The PySpark job script can be found at src/job.py:
# src/job.py
"""
The task of this job is to read the `big.txt` file
to find top 10 5-letter words by their frequency
and save it as a JSON file.
"""

import json
import os
import sys
import boto3
from operator import add, itemgetter
from pyspark.context import SparkContext
from awsglue.context import GlueContext
from awsglue.job import Job
from awsglue.utils import getResolvedOptions


# The IS_IN_CONTAINER variable is used to detect whether
# the code is running in a container.
#
# Defined in `run-docker.sh`
IS_IN_CONTAINER = os.getenv("IS_IN_CONTAINER") or False


def s3_upload_text(s3_client, filename: str, text: str):
    """
    Uploads the `text` under the specified `filename` to S3.

    It falls back to the local file system when run inside a container.

    Args:
        filename: The S3 URI to upload to
        text: The text content to upload
    """
    if IS_IN_CONTAINER:
        with open(filename, "w") as file:
            file.write(text)
    else:
        bucket, _, key = filename[5:].partition("/")

        s3_client.put_object(
            Body=text,
            Bucket=bucket,
            Key=key,
        )


# Grab arguments set for this job run.
# Remember to list all the required arguments in the list.
args = getResolvedOptions(
    sys.argv,
    [
        "JOB_NAME",
        "INPUT_FILE_NAME",
        "OUTPUT_FILE_NAME",
        "RANK",
        "WORD_LENGTH",
    ],
)

# We then parse the arguments to their desired types.
JOB_NAME = args["JOB_NAME"]
INPUT_FILE_NAME = args["INPUT_FILE_NAME"]  # S3 URI
OUTPUT_FILE_NAME = args["OUTPUT_FILE_NAME"]  # S3 URI
RANK = int(args["RANK"])
WORD_LENGTH = int(args["WORD_LENGTH"])


# Spark and Glue related boilerplate needed to setup the environment.
sc = SparkContext()
glueContext = GlueContext(sc)
spark = glueContext.spark_session
job = Job(glueContext)
job.init(JOB_NAME, args)


print("Job started")

# We begin by reading the textfile.
# Remember that the file is not read yet, we are justing creating the DAG.
text_file = sc.textFile(INPUT_FILE_NAME)

# More transformations follow:
# We use various builtin RDD transformations here.
# The terminal method call `top` is an action, at which point the actual processing the
# DAG happens.
counts = (
    text_file.flatMap(lambda line: line.split())
    .filter(lambda word: len(word) == WORD_LENGTH)
    .map(lambda word: (word, 1))
    .reduceByKey(add)
    .top(RANK, key=itemgetter(1))
)

top_K_words = dict(counts)


print("Processing completed. Uploading the results...")


# Finally, we upload the results to S3
S3_CLIENT = boto3.client("s3")
s3_upload_text(S3_CLIENT, OUTPUT_FILE_NAME, json.dumps(top_K_words))


print("Job finished")


job.commit()
Running on Docker locally
The best part of this tutorial is that you do not need to have an AWS account to try this out. You can run the PySpark jobs locally in a Docker container.
Make sure you have Docker installed on your computer. Once that is done, simply run the following command to build and run the container image: ./run-docker.sh. You may edit the shell script to tweak the arguments passed to the job.
Note that you may be required to make the datastore directory writable by running the command:
chmod a+w datastore
Upon successful completion, it should create a file under datastore/pyspark:top-10_5-letter_words.json. Check out the file and compare the output against the datastore/python:top-10_5-letter_words.json. Reach out to me if you find any differences… ;)
Running on AWS Glue
Now, let’s get the PySpark job running on AWS Glue. To do so, you must follow the next section to set up your account with the necessary access and prepare the environment.
Setup and Prerequisites
Add these policies to the user:
AWSGlueConsoleFullAccess-
Gives full access to the AWS Glue services
-
S3 R/W access to any buckets that is prefixed by
aws-glue-*
-
Create an IAM service role for AWS Glue
-
AWS Glue > Getting Started > Prepare your account for AWS Glue > Setup roles and users
-
Choose users > Select your account > Next
-
Choose access to Amazon S3 > No additional access > Next
-
Keep default > Next
-
Click Done
Read Setting up IAM permissions for AWS Glue for further help with setting up IAM permissions for AWS Glue.
Let’s create a new bucket in S3 for the purpose of this tutorial. We’ll name it aws-glue-datastore as the bucket name must start with aws-glue.
In order to get to the speed, we will use Terraform to orchestrate the deployment process.
The Terraform config file can be found at main.tf:
# main.tf
data "aws_caller_identity" "current" {}

data "aws_iam_role" "aws_glue_service_role" {
  # Make sure to use the correct name for the role you created.
  name = "AWSGlueServiceRole"
}

resource "aws_s3_bucket" "aws_glue_assets_bucket" {
  bucket = "aws-glue-assets-${data.aws_caller_identity.current.account_id}"
}

resource "aws_s3_object" "datastore_big_txt" {
  bucket = aws_s3_bucket.aws_glue_assets_bucket.bucket
  key    = "datastore/big.txt"

  source = "datastore/big.txt"
  etag   = filemd5("datastore/big.txt")
}

resource "aws_s3_object" "job_script" {
  bucket = aws_s3_bucket.aws_glue_assets_bucket.bucket
  key    = "src/job.py"

  source = "src/job.py"
  etag   = filemd5("src/job.py")
}

resource "aws_glue_job" "glue_tutorial_job" {
  name = "glue_tutorial_job"

  role_arn = data.aws_iam_role.aws_glue_service_role.arn

  glue_version      = "4.0"
  number_of_workers = 2
  worker_type       = "G.1X"
  timeout           = 10

  execution_property {
    max_concurrent_runs = 1
  }

  command {
    name            = "glueetl"
    python_version  = "3"
    script_location = format("s3://%s/%s", aws_s3_object.job_script.bucket, aws_s3_object.job_script.key)
  }

  default_arguments = {
    "--enable-auto-scaling" = true
    #    add custom arguments here
    "--INPUT_FILE_NAME"  = format("s3://%s/%s", aws_s3_object.datastore_big_txt.bucket, aws_s3_object.datastore_big_txt.key),
    "--OUTPUT_FILE_NAME" = format("s3://%s/datastore/glue:top-10_5-letter_words.json", aws_s3_bucket.aws_glue_assets_bucket.bucket),
    "--RANK"             = 10,
    "--WORD_LENGTH"      = 5,
  }
}
Run the following commands in order to deploy the infrastructure:
-
terraform init -
terraform plan -
terraform apply
Running
-
Glue homepage > ETL jobs from the sidebar
-
Open
glue_tutorial_jobfrom the list -
Click on the orange button on the top right to run the job.
-
Then, navigate to the “Run details”

-
Keep an eye on the execution time and the Run status.
-
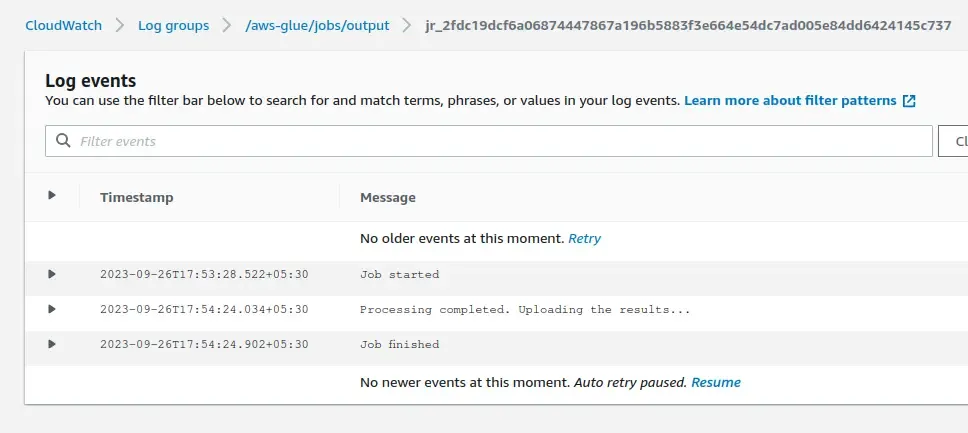
The output and error logs are also linked under Cloudwatch logs
- Once the run completes successfully, we shall verify the generated output file under
datastore/glue:top-10_5-letter_words.jsonin the bucket that we created earlier.
Tips
PySpark tips:
-
Set a default timezone in the Spark config for deterministic timezone handling.
-
Use cache to cache the data frames and reduce the processing times.
-
Use
df.pandas_api()method to get aPandasOnSparkDataframe, instead ofdf.toPandas() -
When using
df.coalesce(1), make sure all the data can fit into memory of a single partition!! -
Use
df.groupBy.applyInPandasmethod to aggregate data (this loads all the data of a group in memory!!) -
Avoid UDF as far as possible, as it incurs the overhead of serializing the Python function to JVM.
-
Don’t use star imports to avoid polluting the namespace and collisions with Python builtins! Use
import pyspark.sql.functions as Fto use the built-in functions. -
Avoid printing the dataframe to reduce the I/O overhead and unnecessary collection of data from partitions
-
PySpark’s
input_file_name()is unreliable; useattachFilenamefrom Glue (undocumented) -
PySpark writes files in partitions even after
coalesce(1). To save the file in your own file path, serialize the output to string and use the AWS SDK to write appropriately.
Local dev tips:
-
Always refer to the available installed versions of the Spark, Python, and the dependencies from the Glue documentation.
-
Install the AWS Glue library for type hints.
-
Use Docker to run the script locally before deployment.
-
Use
explainto examine the execution plan.
Deployment tips:
-
Use Terraform to manage Glue jobs.
-
Use Terraform workspace to isolate environments.
-
Make sure to allocate the resources judiciously, such as the number of DPU that are necessary for the job to run. Over-allocation or under-allocation of resources will affect costs and performance.